> ## Documentation Index
> Fetch the complete documentation index at: https://speckle-assistant.mintlify.site/llms.txt
> Use this file to discover all available pages before exploring further.

# Receiving

export const app_0 = "AutodeskRevit"

export const versions_0 = "2020, 2021, 2022, 2023 and 2024"

export const connector_0 = "Revit"

<div class="callout my-4 px-5 py-4 overflow-hidden rounded-2xl flex gap-3 border-2 border-red-600 bg-red-100/50 dark:border-red-600 dark:bg-red-400/20" data-callout-type="warning">
  <div class="mt-0.5 w-4" data-component-part="callout-icon">
    <svg class="flex-none w-5 h-5 text-red-700 dark:text-red-300" fill="none" viewBox="0 0 24 24" stroke="currentColor" stroke-width="2" aria-label="Warning">
      <path stroke-linecap="round" stroke-linejoin="round" d="M12 9v2m0 4h.01m-6.938 4h13.856c1.54 0 2.502-1.667 1.732-3L13.732 4c-.77-1.333-2.694-1.333-3.464 0L3.34 16c-.77 1.333.192 3 1.732 3z" />
    </svg>
  </div>

  <div class="text-sm prose min-w-0 w-full text-red-700 dark:text-red-300" data-component-part="callout-content">
    <b>Notice</b>: This user guide is based on the legacy {connector_0} connector.<br />
    We recommend using our new connectors instead, as they are easier to use and actively maintained. This legacy documentation may not be up to date.
  </div>
</div>

<Info>
  Legacy Speckle supports {app_0} versions: {versions_0}
</Info>

In this section, you will learn how to receive models sent to Speckle into Revit.

<Note>
  We have renamed the core concepts in Speckle to be more widely understandable.

  * <i>Streams</i> have been renamed to <b>projects</b>
  * <i>Branches</i> have been renamed to <b>models</b>
  * <i>Commits</i> have been renamed to <b>versions</b>
</Note>

## Receiving a Speckle model

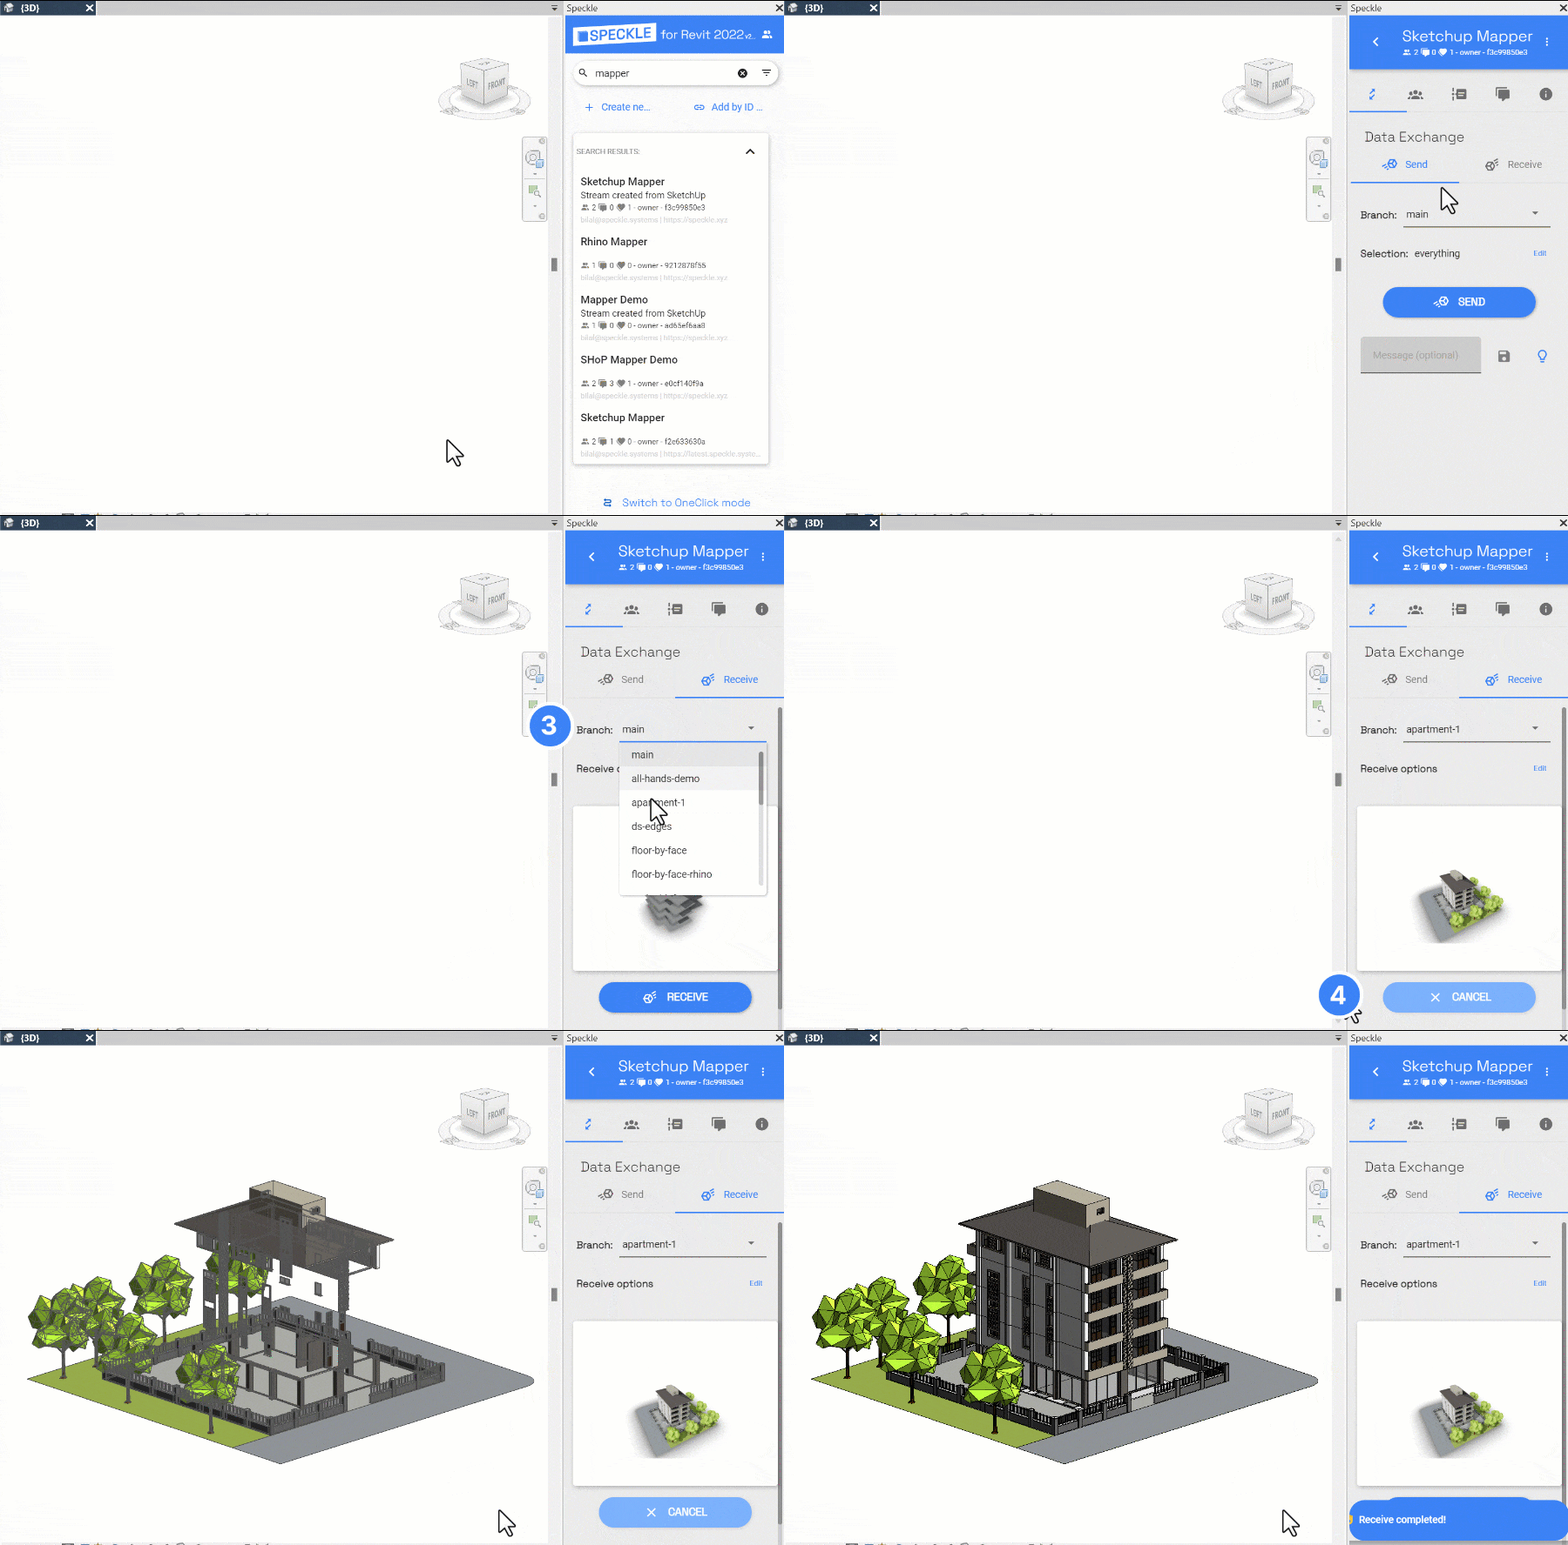
<img src="https://mintcdn.com/speckle-assistant/fg3pAWkGJ20EuRbE/images/legacy/revit/receiving-model.gif?s=bab7778b688cfb1e73b8f9176e0dd6e1" alt="Receiving model" width="900" height="592" data-path="images/legacy/revit/receiving-model.gif" />

To receive a Speckle model:

1. Select a Speckle **Project.**
2. Switch to **Receive** tab.
3. Select a Speckle **Model** to receive from
4. Click **Receive**.

That's it! You will have the latest version of the selected model received.
<Tip>
  If you're interested in learning more about how we handle models from CAD applications, check out [Speckle Mapper](/legacy/user/mapping-tool.md).
</Tip>

## Receiving a specific version

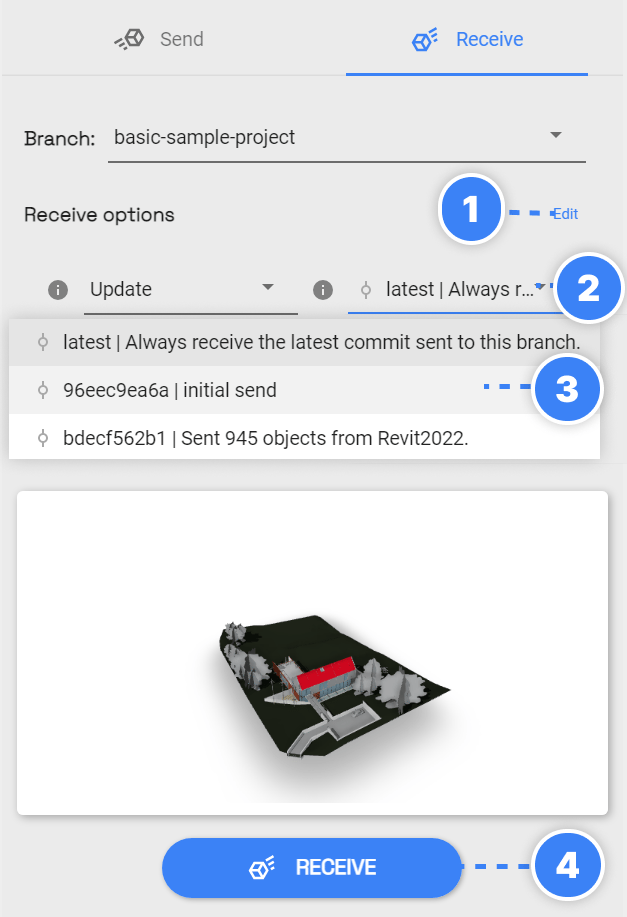
<img src="https://mintcdn.com/speckle-assistant/fg3pAWkGJ20EuRbE/images/legacy/revit/receive-specific-version.png?fit=max&auto=format&n=fg3pAWkGJ20EuRbE&q=85&s=f54f7ee02fca26752852161074ed286b" alt="Receive specific version" width={350} data-path="images/legacy/revit/receive-specific-version.png" />

If you want to receive a specific version of the selected model:

1. <b>Expand</b> Receive Options by clicking on the <b>Edit</b>
2. Click on the <b>Version</b> Dropdown.
3. <b>Select the version</b>.
4. Click <b>Receive</b>.

## Receive modes

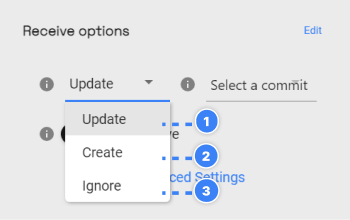
<img src="https://mintcdn.com/speckle-assistant/fg3pAWkGJ20EuRbE/images/legacy/revit/receive-modes.png?fit=max&auto=format&n=fg3pAWkGJ20EuRbE&q=85&s=4b4279e0bca67e90854ae1d7f824f9b9" alt="Receive modes" width={350} data-path="images/legacy/revit/receive-modes.png" />

When receiving a model that has been received before, you might want to <b>Update</b>, <b>Create</b> or <b>Ignore</b> elements that were already created before. This is when the <b>Receive Mode</b> setting comes in! This is how it works:

1. <b>Update</b>: updates elements if they already exist and creates missing ones (current behavior in Revit)
2. <b>Create</b>: always creates new elements even if pre-existing (current behavior in Rhino)
3. <b>Ignore</b>: skips elements if they already exist